SAP SPRO Chart of Accounts & Company Code

SAP SPRO Chart of Accounts & Company Code

Though you can have multiple Charts of Accounts in SAP,
company codes are assigned to only one chart of accounts.
This is done in configuration (SPRO)
(T-code: OB62 - Assign Company Code -> Chart of Accounts).


T-code: F.10 - Chart of Accounts
Report of accounts in a chart of accounts.
Lots of ways to limit your results, but can’t limit by Company Code!
You will definitely want to limit by chart of accounts.

T-code: OB62 - Assign Company Code -> Chart of Accounts
SAP: OBY2

T-code: OBY2 - Copy Company Code: G/L Accounts
When creating a new Company Code, just assigning it to a
chart of accounts in OB62 doesn’t automatically create those
accounts for the new company code.

i.e. you won’t be able to post any entries until you’ve created the
accounts for the company code.

OBY2 lets you copy all of the accounts that were created for
another company code to your new one.

GL Postings are assigned to only 1 company code
You can do “cross-company code” postings
(i.e. DR CoCde A and CR CoCde B), but SAP will automatically
generate the off-setting entries within each company code so
that their books stay in balance (debits = credits).

There is config around Intra-company postings to determine
where you want those offsets to go.

T-code: FS00 - Edit G/L Account Centrally
This is usually the preferred t-code for manually creating GL
Accounts since it allows you to create both the chart of accounts
piece and the company code pieces.

In FS00, you may need to create an account for multiple company
codes. This can be done by changing the CoCde and using the
“Create with reference button” in FS00.
SAP: CX16

T-code: FSS0 - Edit Accounts in Company Code
FSS0 allows you to edit just the Company Code (CoCde) portion
of the GL Account.

T-code: FSP0 - Edit Account in Chart of Accounts
FSP0 allows you to edit just the Chart of Accounts portion of the
GL Account.

T-code: CX16
Consolidation Chart of Accounts - Hierarchy Display

CX16 allows you to create/edit financial statement items
(FS Items) and their hierarchy for the Consolidated Chart of
Accounts used in the EC-CS consolidation system.

SAP Multiple Selection

Pasting in multiple selections .
There are many multiple selections across SAP Screen Display.

Example :
1.Go to Tcodes FS10N
The below screen will be displayed.


2. Click Multiple Selection button

3 The below screen will be displayed.


Enter Multiple Codes you want to include in a
subscreen
Enter a Range of Multiple codes you want
to include in a subscreen.
Enter Multiple Codes you want to Exclude from a
subscreen
Enter a Range of Multiple codes you want
to exclude from a subscreen.

You can copy and paste mulitple items into those boxes (about 8 boxes) using Ctrl-V like normal.
More boxes will appear after you hit enter, and you can scroll and paste into them as well.


But if you want to paste in lots of selections at the same time, you can use the magical “Import from text file”button
The following screen will appeared

To use the Import from text file button, you can either put the content you want to add into a text file and upload it,
or you can copy it from it’s source (SAP, Excel, etc) and then click the Upload from clipboard button.
This can paste lots and lots of items to you multi-select


Also check out the Multiple Selection button .
This brings up a search screen that you can do a search and then use check boxes to select mulitple items from the search result

SAP Podcast :Report Financial Statement

SAP Podcast : Make Report of Financial Statement

Hi...this podcast is under developing, i try my very first video podcast but not perfectly done yet.


SAP F.81 Reverse Accrual Defferal Doc

SAP F.81 Reverse Accrual Defferal Document

Previous month you have entered accrual entries using SAP T_code : FBS1

To reverse the accrual documents do the following :


1. Go to T_code : F.81.

or from Menu path : Accounting ->Financial Accounting -> General Ledger -> Periodic Posting -> Closing -> Valuate.

2. Enter relevant field.
-Posting date & Entry date is original accrual date.

3. Tick "test run"
4. Select "Do not process"
5. Execute


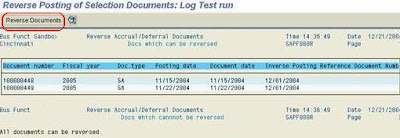
6. After checking, Click "Reverse Document" button.
Back

SAP LSMW Concept

CONCEPT OF SAP LSMW

LSMW read documents and convert the contents to the target structure and the corresponding fields.
Then the data from the target structure create a SAP format of the document, this document can be used to transmit data.
SAP did not provide any standards conversion.

Steps:
- Read file (local or server, and we need to accept pre-defined data source structure).

- Save the contents of the documents as LSMW documents.

- Define the relationship between the structures and fields distribution .
(as defined in the source and target structure mapping).

- Define source fields and the value of the target fields conversion rule
(LSMW file how to change the definition of target structure)

The above structure and the conversion rule defined are executable in ABAP procedures and generating SAP format documents in the transfer process or LSMW in implementation.

LSMW support of the transfer methods:
- Standard transfer process (batch input, call transaction, direct input).
- IDocs
- BAPI
- Recording SHDB and generate batch input.

STEPS :
1. Go to LSMW
Maintain object attribution

2. Maintaining the original format
- Maintain source Structure
- Maintain source fields

3. Maintaining the original format and objectives of the mapping relationship between format
4. Maintain structure relations.
5. Maintain field mapping and conversion rules.
6. Maintain fixed values, translations, user-defined routines

Achieve the original data -> objective data format
7. Specify files
8. Assign files
9. Read data
10. Display read data
11. Convert data
12. Display converted data

Upload the target format data to SAP
13. Create batch input session
14. Run batch input session

SAP LSMW Data migration for Create Vendor (XK01)

SAP LSMW for data migration for XK01 transaction.
You can create lsmw for data migration as follows (using session method):
Example for xk01 (create vendor)

Initially there will be 20 steps but after processing 1 step it will reduced to 14 for session method.
1. TCode : LSMW.

2. Enter Project name, sub project name and object name.
Execute.

3. Maintain object attributes.
Execute
select Batch Input recording
goto->Recording overview
create
recording name.
enter transaction code.
start recording
do recording as per ur choice.
save + back.
enter recording name in lsmw screen.
save + back


Now there will be 14 steps.
2. MAINTAIN SOURCE STRUCTURES.
Here you have to enter the name of internal table.
display change
create
save + back

3. MAINTAIN SOURCE FIELDS.
display change
select structure
source_fields->copy fields.
a dialogue window will come .
select -> from data file
apply source fields
enter No. of fields
length of fields
attach file
save + back

4. MAINTAIN STRUCTURE RELATIONS
display change
save + back

5. MAINTAN FIELD MAPPING & CONVERSION RULE
display change
click on source field, select exact field from structue and enter
repeat these steps for all fields.
save+back

6. MAINTAIN FIXED VALUES, TRANSACTION, USER DEFINED
execute
save + back

7. SPECIFY FILES.
display change
click on legacy data
attah flat file
give description
select tabulatore
enter
save + back

8. ASSIGN FILE
execute
display change
save + back

9. IMPORT DATA.
execute
display change
save + back

10. DISPLAY IMPORTED DATA
enter ok, it willl show records only.
back

11. CONVERT DATA
execute
display change
save + back

12. DISPLAY CONVERTED DATA
execute
display change
save + back

13. CREATE BATCH INPUT SESSION
tick keep batch input folder
F8
back

14. RUN BATCH INPUT SESSION.
sm35 will come
Object name will be shown here
select object & process


SAP SD relationship tables of SO, Delivery & Invoice

SAP SD Relationship between sales order number, delivery number and billing number tables

VBELN is the field name in the tables of VBAK (sales order), LIKP (delivery) and VBRK (billing).
VBFA table provides links between preceeding (sales document) and subsequent (delivery) documents.
in VBFA table a delivery can be a preceeding document to an invoice(subsequent document)


Document number can be found within the transaction table.
in the delivery : field VGBEL contain the sales order number.
in the invoice : field VGBEL contain the delivery number & field VBELV contain sales order number.


SAP Setting date format

SAP Setting date format

1. Go to T_code : SU3
Or below menu path


2. Select suitable default "date format".

Back

SAP Enter Currency Exchange Rates Table

SAP Change Foreign Currency Exchange Rate Table


1. Path : Accounting -> Financial Accounting -> Accounts Payable -> Environment -> Current Settings -> Enter Exchange Rates


2. Below pop-up box will be appeared.
3. Click "OK" icon


4. Below table will be displayed.
5. Click "position" button to enter selection criteria for exchange rate search.


6. Input fields in below pop-up Currency Selection criteria
- "M" is standard translation at average rate which is used in all standard foreign exchange transaction.

7. Click "OK" button.


8. Below currency exchange rates table will be displayed.


9. Click "New Entries" Button for enter a new exchange rate.

10. Enter the fields in below table
-ExRt = Exchange rate type
-ValidFrom = Effective date of the exchange rate displayed.
-Ratio(from) = always 1 (default)
-From = Originating currency for the transaction (e.g. USD)
-Dirquot = Direct Quotation e.g. 1 USD = JPY.114.06
-Indir.quot = Indirect Quotation e.g 1 JPY = USD. 0.0088
This field is not in use and always display "0.00000"
-To = always 1 (default) this is reporting currency (e.g. JPY)


Setting Option

SAP SD Configuration

SAP SD Configuration

1. Maintaining Sales Organization
Sales Organization is an organizational unit responsible for the sale of certain products or services.
IMG -> Enterprise Structure -> Definition -> Sales and Distribution -> Define, copy, delete, check Sales organization

2. Assigning Sales Organization to Company Code
This assignment ensures all the sales made through this Sales Organization are accounted for in the assigned Company Code (Company Code is created by FI Consultant)
IMG -> Enterprise Structure -> Assignment -> Sales and Distribution -> Assign Sales Organziation to Company Code .

3. Maintaining Distribution Channel
Distribution Channel is the way, in which Products or Services reach Customers.
IMG -> Enterprise Structure -> Definition -> Sales and Distribution -> Define, copy, delete, check distribution channel

4. Assigning Distribution Channel to Sales Organization
This assignment ensures, a Sales Organization can supply Materials to Customers through this Distribution Channel.
IMG -> Enterprise Structure -> Assignment -> Sales and Distribution > Assign distribution channel to sales organization

5. Maintaining DivisionDivision
is a way of grouping materials, products, or services.
IMG -> Enterprise Structure -> Definition -> Logistics - General -> Define, copy, delete, check division

6. Assigning Division to Sales Organization
IMG -> Enterprise Structure -> Assignment -> Sales and Distribution -> Assign division to sales organization


7. Setting up Sales Area
All the sales are made from a particular sales Area.
For creating a Sales Order Sales Area is compulsory.
IMG ->Enterprise Structure -> Assignment -> Sales and Distribution -> Set up sales area

8. Assigning Sales Organization- Distribution Channel- Plant
Plant is created by MM Consultant.
IMG -> Enterprise Structure -> Assignment -> Sales and Distribution -> Assign sales organization - distribution channel - plant

9. Define Shipping Points
Shipping Point is the Organizational element, which is responsible for shipping the Materials to the Customers.
IMG -> Enterprise Structure -> Definition -> Logistics Execution -> Define, copy, delete, check shipping point

10 Assigning Shipping Point to Plant
This assignment ensures that goods from different Plant can be dispatched from different Shipping Points.
IMG -> Enterprise Structure -> Assignment -> Logistics Execution -> Assign shipping point to plantNote: Ensure to do the undermentioned configuration also though it is not in Customizing node of Enterprise Structure.

11. Defining Common Distribution Channels for Master DataUse
The purpose of this activity is to define distribution channels which have common master data.
Procedure Access the activity using one of the following navigation options:
IMG Menu -> Sales and Distribution -> Master Data -> Define Common Distribution ChannelsTransaction Code: VOR1

12. Defining Common Divisions for Master DataUse
The purpose of this activity is to define distribution channels which have common master data.. Procedure Access the activity using one of the following navigation options:
IMG Menu -> Sales and Distribution -> Master Data -> Define Common DivisionTransaction Code: VOR2


SAP MIGO Partial Goods Receipt of a PO

SAP MIGO Partial Goods Receipt of a PO

1. Go to T_code : MIGO

2. Select Goods Receipt
3. Select Purchase Order
4. Enter PO number for goods to be received.
5. Hit "Enter"


6. Enter Document date & posting date
7. Enter Header text (comment) if necessary.
8. Close detail data.


9. Notice that movement data is "101"
10. If you only received first item, then Check the "OK" box for first line item.
therefore, the second item need not be processed


10. If you only received 3 pcs out of 10 pcs of item one & 2 pcs out of 10 pcs of item two, then Check the "OK" box for both line item

11. Input actual quantity (3 & 2 pcs ).
12. Hit "Enter"


11. Click "Check" button to find out if there is any error.
12. Check the "status" column .
. Green means OK
. Yellow means Warning
. Red means error
13. This is just a warning that there are still quantities yet to be processed in this PO.
14. Click the "check mark"


SAP MIGO Goods Receipt all items in a PO

SAP MIGO Goods Receipt all items in a PO.

1. Go to T_code : MIGO

2. Select Goods Receipt
3. Select Purchase Order
4. Enter PO number for goods to be received.
5. Hit "Enter"


6. Enter Document date & posting date
7. Enter Header text (comment) if necessary.
8. Close detail data.


9. Notice that movement data is "101"
10. Check the "OK" box.

11. Click "Check" button to find out if there is any error.
12. Check the "status" column .
. Green means OK
. Yellow means Warning
. Red means error

13. Post, If the message is "Document is OK"


14. Noted the document number.


SAP Create SO in HQ (Supplier) from subsidiary PO data

SAP Create SO in HQ (Supplier) from subsidiary (Buyer) PO data

Normally used for intercompany transaction.

If Subsidiary A raise PO with pricing to HQ.
It doesn't have to be a special pricing procedure.
You can choose the following :
- 1-step move with no billing/delivery (intercompany 301),
- 2-step move with no billing/delivery (intercompany 351),
- 2-step move with delivery,
- 2-step move with delivery and billing

You may configure where buyer (normally subsidiaries in the same group) can create Sales Order in supplier (normally Head Quarter).

These are all standard out of the box, and data flows naturally from document to document.
The invoice can cause the invoice receipt to be automated, but it relies on a little EDI setup.

If Buyer A raise a PO on HQ and HQ raise Delivery against the buyer PO.
You can dictate in the billing create from delivery that the price be adopted from originating PO.

Ensure that you have a price condition in SD that matches the name of the price condition used in the PO, then in VTFL at item level, set Pricing Souce B - Purchase Order/Delivery.

This set-up can reduce a workload to issue SO one by one in HQ which has many subsidiaries raise PO on HQ.

Subsidiary must have a authorized person to approve PO which will create SO in HQ.

Each subsidiary will be given a different Tcode
e.g : Subsidiary A :ZPT114R010, Subsidiary B :ZPT114R011

The sample below is not standard SAP.

1. Below is the sample after a subsidiary enter the Tcode ZPT114R010

2. Please enter some search conditions.
If you don’t enter search condition, the procedure will be very slow.
I recommend you to enter search conditions as many as possible.

3. Click the “Execute” icon.


4. The POs only such that the Document type of which is ZOC and the vendor of which is Head Quarter are displayed.

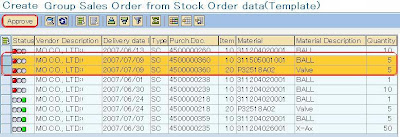
Approve the lines whose statuses are Red Signal.
Please select the line which you want to approve.

■■■In case that there are plural line items for single PO, each line item is displayed.
Select all line items which have the same PO number and approve them. ■■■

5. Click “Approve” icon.


6. Please check the message and the statuses of the lines.


The status will be Green after approving


7. You can check the status of approving at the right of this screen.
There is information : Approved by, approved date & time, etc


SAP ME2L Overview Pending PO

SAP ME2L Overview Pending PO

1. Go to Tcode ME2L


2. Click "get variant" icon


3. Select variant which you have been saved.

4. Click "OK" icon


5. The below screen will be appeared

6. Enter purchasing organization

7. Enter purchasing group

8. Enter Plant


9. List of Pending PO will be displayed.

SAP ME22N Change Purchase Order

SAP ME22N Change Purchase Order

1. Go to Tcode ME22N


2. Make sure that Goods Received & Invoice Verification were already reverse.

3. Highlight all line items and click "trash" icon


4. Click "Yes" to the warning.


5. Save

6. Notice the message


7. By pass the warning message by hitting enter.

8. Noted the document number.