SAP MIR4 Display MIRO Invoice

SAP MIR4 Display Posted MIRO Invoice Document
1. Go to MIR4
2. Enter the document number and fiscal year.
Enter, green check, or click Display doc


3. The invoice document is displayed.
To see other related documents, click on Follow-on documents.


4. The system displays the document numbers for follow-on accounting, special purpose ledger, and FM documents.
You may view any of these documents by selecting it & choosing the "magnifying glass" icon


5. The accounting document is displayed.
Return to the original document by clicking the back arrow.

SAP F-44 Clearing MIRO Vendor Open Item

SAP : Clearing Vendor Open Items for a Logistics Invoice with F-44

1. Go to FI Transaction code F-44

2. Enter the vendor number and click on "process open items" button.

3. Click on the "editing options" button only if your “USD gross” amounts are shaded blue.


5. Select items initially inactive

6. Save

7. This Message will be appeared “The new options have been activated”.

8. Double click an amount to select or de-select.

9. Selected items appear in blue.
To clear the vendor open items, select the matching debit and creditamounts along with the matching document number.
The Not assigned amount should show zero.


10 Save

Back

SAP VAT calculation different System & Invoice

What if the system calculated tax for tax code P1 is different from the tax on the invoice?

To accommodate the difference and assign the difference to the actual expense :
1. Enter the full amount (including the sales tax) of the invoice in Amount field.
2. Do not select the Calculate Tax check box.
3. Enter the amount of sales tax to be paid in the Tax amount field.

NOTE:
Tolerance level for invoice differences is 10% up to $100;
this allows adjustment for sales tax as necessary for a zero balance.

SAP MR8M Reversing MIRO Invoice

SAP MR8M Reversing a Logistics Invoice

1. Go to Tcode MR8M


2. enter the logistics invoice number , fiscal year of document to be cancelled.

3. Enter an invoice Reversal reason


4. Enter the posting date (today’s date), if the invoice was created in a closed
period. (Reason 02)

5. Click on the "display doc." button

6. Click Follow-on Documents


7. Double click on the accounting document


8. Ensure that this is the invoice for reversal.


9. After viewing the document, Use the "green back arrow" to return to the first screen


10 Post the reversal with the "diskette" icon.

Back


SAP Delete Held MIRO

SAP : To delete a held MIRO
from the menu, Choose Invoice document -> Delete


SAP MIR6 Post MIRO Invoice

SAP MIR6 to Post Held MIRO Invoices

1. Go to Tcode MIR6


2. Type in the fiscal year, user name, and company code.
Choose "Entry Type" : Held/Parked
Choose "Invoice Status: Held, Parked, and Parked as Complete.
You can use dates and reference codes to further narrow down the selection

3. Click on the document number to enter the change or post mode (MIR4).

Make changes to line items as necessary.

4. Click on the "simulate" button for an overview of the document when data entry is complete.

5. Use the "diskette" icon to post .
A message will appear if posting is successful .

SAP MIR6 hold MIRO Invoice

Using SAP Transaction MIR6 for Held MIRO Invoices

• An invoice created in MIRO and put on hold is retrieved for changes, deletion, or posting with Transaction MIR6.

• Once a logistics invoice, MIRO, has been posted, changes with MIR6 are no longer possible.

A posted MIRO creates a Financial Accounting (FI) invoice document and any changes will now have to be made on the FI document using FB02

SAP Hold in MIRO

SAP Hold in MIRO

• Document in Tcode can be saved without posting by clicking the hold icon.

• When using hold option, System will assign a document number and it is advised to make note of the document number in order to find it easily to post it to the system.
Hold the document will be indicated by system as “saved” rather than “posted.”

• When the document is posted, the system will assign it the same document number that it had when it was held.

• Note that a logistics invoice may be parked, held, or parked as complete by using transaction MIR7 rather than MIRO.

SAP MIRO Enter Purchase Invoice with PO

SAP MIRO Enter Invoice Verification

Go to SAP Tcode : MIRO

1. On the Basic Data Tab, enter the Invoice Date.
This will be used as the baseline date in calculating the date that the invoice
will pay.

2. Enter a Reference number

Normally is vendor’s invoice number & system will check this field for
duplicates.

3. Enter the invoice amount.

4. Select the calculate tax check box and the proper tax code.
Tax codes are V0 (tax exempt), V1 (sales tax added)
This code can be other character as customized when setting .

(see : if the system calculated tax for V1 is different from the tax on the invoice?)


5. Enter P.O. number.
If the PO number is unknown, click on the dropdown button to search.
Select the PO No., click enter and the PO information will be copied into the
invoice payment.

6. Check to make sure that the tax code from the PO matches the one selected for the invoice. Change it if necessary

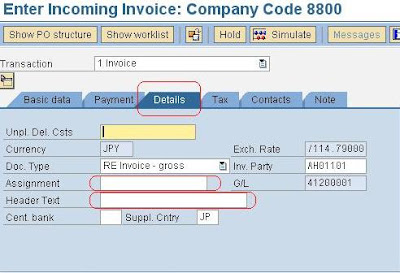
7. Click the Details tab. Enter

Fill in the assignment field and header text
NOTE : The assignment field will print on the remittance advice.
The recommended entry is the invoice number.
Header texts will also print on the remittance advice

8. If there are unplanned delivery costs, enter them here.

9. Click the Payment tab.


Fill in the payment method.
-Select W if the invoice is being paid by warrant from a treasury account.
-Select C for check if you are generating a check from a cash account.
-Select A for direct deposit if the payment is being deposited directly into the vendor’s bank account.

SAP Attach document to Journal Entry

SAP Attach document to Journal Entry


Using SAP, you can attach supporting documents that accessible to people who work in different place or only for your easy & quick finding.
Many document types like Excel, Word, PDF, JPEG etc can be attached.

Attachment can be made even after you have posted the entry and also for parked entry.

Procedure :
1. Go to SAP FB03


2. Click "Service for Object" icon

Or
from path : System -> Service for Object


3 The following list of icons will be appeared


4. Click "Create" icon

Choose "Create Attachment"

5. Upload the file from your PC and attach to SAP.
You can repeat the process to upload multiple attachments as needed.

6. To check attachment Click "Attachment List " icon


P.S: For parked document, you’ll need to post it using FBVO

7. You can also write your personal note to the journal entry.
This will NOT be shown in Remittance advice or Line item