Inter-Company Billing - Automatic Posting To Vendor Account (SAP-EDI)
Automatic posting to vendor account is done by EDI. In our case where both companies
are proccessed in the same system (& client), it is sufficient to create Idoc.
This proccess requires several steps:
1. Creating a Customer to represent the receiving Company.
2. Creating a Vendor to represent the supplying company.
3. Creating a Port
4. Maintain an Output Type
5. Creating a Logical Address
6. Creating a Partner Profile for both Customer & Vendor
7. The relevant MM customizing is maintained.
8. The relevant FI customizing is maintained.
1. Creating a Customer to represent the receiving Company.
The customer has already been created (XD01) for the purpose of Intercompany
processing and entered in the approperiate transction in customizing (Sales and
Distribution à Billing à Intercompany Billing à Define Internal Customer Number By
Sales Organization).
Note: The cutomer has been created in the supplying company code.
The organizational data in this case is:
Supplying Company Code: 1180
Supplying Plant: 1180
Supplying Sales Organization: 1180
Supplying Distribution Channel: 01
Supplying Division: 00
Receiving Company Code: 3100
Customer representing the receiving Company Code: P3100
2. Creating a Vendor to represent the supplying company.
The Vendor is created with the standard transaction (XK01).
Note: The Vendor is created in the receiving Company Code. The organizational data in
this case is the same as above.
Vendor representing the supplying Company Code: P1180
NOTE: There is NO need to “connect” vendor to customer in the control screen.
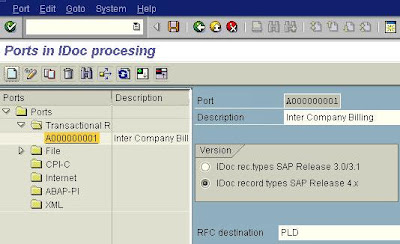
3. Creating a Port
Tools à Business Communication à IDoc Basis à Idoc à Port Definition (T. Code WE21)
Maintain Transactional RFC: (Choose Transactional RFC and press the create icon).
A dialog box will open asking whether you want the system to generate an automatic
name or whether you wish to use your own name.
Port name: Automatically generated
Version: 4.x
RFC destination: PLD (This was defined by the basis people).
Output type RD04 is maintained: Img: Sales and Distribution -> Basic functions -> Output control -> Output Determination -> Output Determination Using the Condition Technique -> Maintain Output Determination for Billing Documents à Maintain Output Types (T. Code V/40).
Note: If the receiving Customer is a numeric number you must add zeros between the
Company code and Customer number so the Logical Address will be 14 digits.
E.g if the customer number was 3100, than the logical address would have been
11800000003100 as can be seen in the second line.
(In our case the customer is an alpha numeric number so the second line was not necessary. It was created just for this documentation and was not saved)
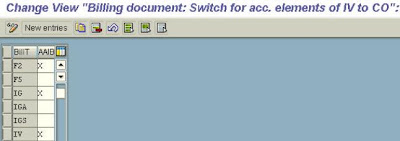
IMG: Sales and Distribution -> Billing à Intercompany Billing -> Automatic Posting To
Vendor Account (SAP-EDI) -> Activate account assignment.
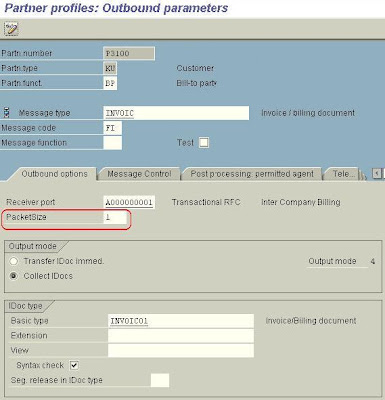
6. Creating a Partner Profile for both Customer & Vendor
Tools à Business Communication -> IDoc Basis -> Idoc -> Partner Profile (T. Code
WE20)

Enter the following data in the appropriate fields:
Partn.funct. BP
Message type INVOIC
Message Code FI
Receiving port A000000001
Basic Type INVOIC01
7. FI CUSTOMIZING
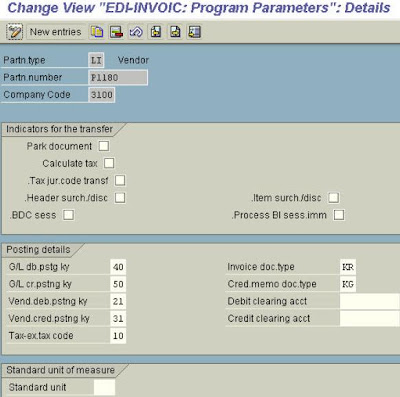
Financial Accounting à Accounts Receivable and Accounts Payable à Business
Transactions -> Incoming Invoices/Credit Memos -> EDI -> Enter Program Parameters
for EDI Incoming Invoice (T. Code OBCE)
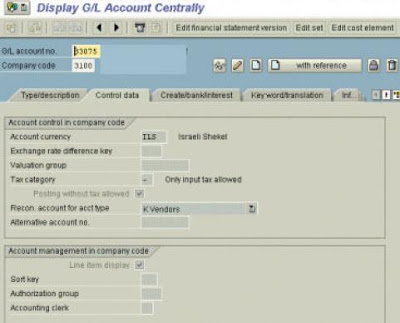
G/L account no. = account number that was entered in transaction OBCB (page 24)
Tax category must allow for input tax.
8. MM Customizing:
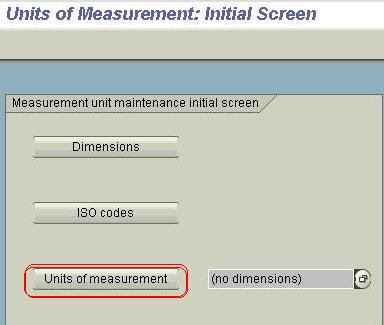
Make sure the Unit of Measure’s ISO Codes are configured correctly.
General Settings à Check units of measurement (T. Code CUNI)
Monitoring
There are several transaction that allow you to monitor the IDoc. First you need to know
the IDoc number. You can see the IDoc number in the processing log in the “Header
output” screen in the billing document.
Automatic posting to vendor account is done by EDI. In our case where both companies
are proccessed in the same system (& client), it is sufficient to create Idoc.
This proccess requires several steps:
1. Creating a Customer to represent the receiving Company.
2. Creating a Vendor to represent the supplying company.
3. Creating a Port
4. Maintain an Output Type
5. Creating a Logical Address
6. Creating a Partner Profile for both Customer & Vendor
7. The relevant MM customizing is maintained.
8. The relevant FI customizing is maintained.
1. Creating a Customer to represent the receiving Company.
The customer has already been created (XD01) for the purpose of Intercompany
processing and entered in the approperiate transction in customizing (Sales and
Distribution à Billing à Intercompany Billing à Define Internal Customer Number By
Sales Organization).
Note: The cutomer has been created in the supplying company code.
The organizational data in this case is:
Supplying Company Code: 1180
Supplying Plant: 1180
Supplying Sales Organization: 1180
Supplying Distribution Channel: 01
Supplying Division: 00
Receiving Company Code: 3100
Customer representing the receiving Company Code: P3100
2. Creating a Vendor to represent the supplying company.
The Vendor is created with the standard transaction (XK01).
Note: The Vendor is created in the receiving Company Code. The organizational data in
this case is the same as above.
Vendor representing the supplying Company Code: P1180
NOTE: There is NO need to “connect” vendor to customer in the control screen.
3. Creating a Port
Tools à Business Communication à IDoc Basis à Idoc à Port Definition (T. Code WE21)
Maintain Transactional RFC: (Choose Transactional RFC and press the create icon).
A dialog box will open asking whether you want the system to generate an automatic
name or whether you wish to use your own name.
Port name: Automatically generated
Version: 4.x
RFC destination: PLD (This was defined by the basis people).

4. Maintain output type
Output Type RD04 - Invoice Receipt MM is a special function, responsible for the execution of the Idoc and will be entered in the Partner Profile later on.
Output type RD04 is maintained: Img: Sales and Distribution -> Basic functions -> Output control -> Output Determination -> Output Determination Using the Condition Technique -> Maintain Output Determination for Billing Documents à Maintain Output Types (T. Code V/40).
Partner functions
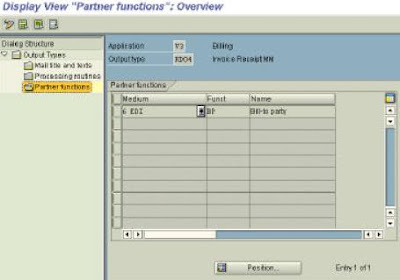
Sales and Distribution -> Basic Functions -> Output Control -> Output Determination à
Output Determination Using the Condition Technique -> Maintain Output Determination
for Billing Documents.

Sales and Distribution -> Basic Functions -> Output Control -> Output Determination à
Output Determination Using the Condition Technique -> Maintain Output Determination
for Billing Documents.
Master Data
Maintain output Master Data
Logistics -> Sales and Distribution -> Master Data -> Output -> (T. Code VV31)
5. Create Logical Address
Img: Sales and Distribution -> Billing à Intercompany Billing -> Automatic Posting To
Vendor Account (SAP-EDI) -> Assign vendor. (T. Code WEL1)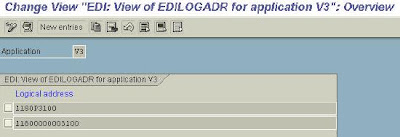
Maintain output Master Data
Logistics -> Sales and Distribution -> Master Data -> Output -> (T. Code VV31)
5. Create Logical Address
Img: Sales and Distribution -> Billing à Intercompany Billing -> Automatic Posting To
Vendor Account (SAP-EDI) -> Assign vendor. (T. Code WEL1)

Logical address 1180P3100 is made of the supplying Company Code (1180) and the
receiving Customer (P3100).
receiving Customer (P3100).
Note: If the receiving Customer is a numeric number you must add zeros between the
Company code and Customer number so the Logical Address will be 14 digits.
E.g if the customer number was 3100, than the logical address would have been
11800000003100 as can be seen in the second line.
(In our case the customer is an alpha numeric number so the second line was not necessary. It was created just for this documentation and was not saved)
The Logical address is completed when the receiving Company Code and the Vendor are
entered in the detail screen.
entered in the detail screen.
It is also necessary to activate the account assignment.
IMG: Sales and Distribution -> Billing à Intercompany Billing -> Automatic Posting To
Vendor Account (SAP-EDI) -> Activate account assignment.

6. Creating a Partner Profile for both Customer & Vendor
Tools à Business Communication -> IDoc Basis -> Idoc -> Partner Profile (T. Code
WE20)

Customer:
Put cursor on Partner type KU and press create.
Enter typ, Agent & Lang,
SAVE
Put cursor on Partner type KU and press create.
Enter typ, Agent & Lang,
SAVE
Enter the following data in the appropriate fields:
Partn.funct. BP
Message type INVOIC
Message Code FI
Receiving port A000000001
Basic Type INVOIC01
Press enter and the screen will change to the following:
Enter PacketSize 1

You can repeat the process for cases where invoice verification is done against purchase
order. in this case enter MM in “message code field.

order. in this case enter MM in “message code field.

As you can see the only difference between the FI & MM invoice is in the message code
and output type.
and output type.
NOTE: You cannot use output type RD04 again therefore you must copy it in
customizing to another output type (in this case RD00)
customizing to another output type (in this case RD00)
7. FI CUSTOMIZING
Financial Accounting à Accounts Receivable and Accounts Payable à Business
Transactions -> Incoming Invoices/Credit Memos -> EDI -> Enter Program Parameters
for EDI Incoming Invoice (T. Code OBCE)

Make sure to maintain posting types, tax code and invoice doc.type.
By leaving the field CoCD blank, all company codes are available.
Assign G/L Accounts for EDI Procedures (T. Code OBCB)
P1180 = Vendor
NOTE:
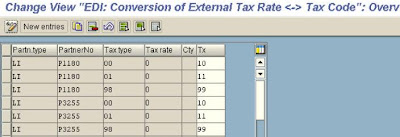
G/L account should not be connected to CO. Assign Tax Codes for EDI Procedures (T.Code OBCD) It is necessary to match the output tax from the sales order to the input tax.
G/L account should not be connected to CO. Assign Tax Codes for EDI Procedures (T.Code OBCD) It is necessary to match the output tax from the sales order to the input tax.
Tax type = Output Tax
Tx = Input Tax
Accounting -> Financial Accounting -> General Ledger -> Master Records -> Individual
Processing -> Centrally (T.Code FS00)

Accounting -> Financial Accounting -> General Ledger -> Master Records -> Individual
Processing -> Centrally (T.Code FS00)

G/L account no. = account number that was entered in transaction OBCB (page 24)
Tax category must allow for input tax.
Make sure manual posting is allowed for the G/L account. (“Create/Bank/Interest”
screen).
screen).
TEXT
In many cases the G/L account has been configured so that text is mandatory. This could
be either Header Text or Item Text.
In many cases the G/L account has been configured so that text is mandatory. This could
be either Header Text or Item Text.
Header Text
No special configuration is necessary. Just enter text in the “Header note”. You may use
the following access sequence.
No special configuration is necessary. Just enter text in the “Header note”. You may use
the following access sequence.
Item Text
It is necessary to implement a userexit in order to fill the item text field. Detailed
instructions are found in note 39503
It is necessary to implement a userexit in order to fill the item text field. Detailed
instructions are found in note 39503
8. MM Customizing:
Make sure the Unit of Measure’s ISO Codes are configured correctly.
General Settings à Check units of measurement (T. Code CUNI)

Optional MM Customizing:
NOTE: This is only necessary for logistics invoice verification.
Materials Management à Logistics Invoice Verification à EDI à Enter Program
Parameters

NOTE: This is only necessary for logistics invoice verification.
Materials Management à Logistics Invoice Verification à EDI à Enter Program
Parameters

Monitoring
There are several transaction that allow you to monitor the IDoc. First you need to know
the IDoc number. You can see the IDoc number in the processing log in the “Header
output” screen in the billing document.
You can use transaction WE02 or WE05. Enter the IDoc number in the selection screen. If you have an error in the IDoc, you could analyze it with transaction WE19


